• About From Fiona
  • Categories
    • Beauty
    • Blogging
    • Food & Drink
    • Lifestyle
    • Travel
  • Work With Me
    • Media Kit
    • Disclaimer
    • Privacy Policy
  • VA Services
  • Nav Social Icons

  • Skip to primary navigation
  • Skip to main content

From Fiona

You are here: Home / Blogging / Blogger / How To – Edit Post Settings in Blogger

Blogger, Blogging · February 17, 2016

How To – Edit Post Settings in Blogger

Table of Contents

  • Labels
  • Schedule
  • Permalink
  • Search Description

This is the second in my “How To” series of blog posts for bloggers with hints and tips on how to accomplish those tasks which established bloggers can probably do in their sleep but will seem daunting a newer blogger. My first post was very basic but great if you feel that you need a refresher or just want to see what I’ve done so far.

This time round I’ve decided to concentrate on the post settings options which you will see on the right-hand side of your screen once you are in the post you are writing up or have finished writing and are about to publish. While there are six options to edit (if you want to) there are only four I will be showing you how to use as I feel that the other two don’t need to be changed and can be left at a default setting.

Labels

Labels can be hugely important for blog organisation and are how I created the options in the drop-down menu under Categories. I find keeping the number of labels I use to a minimum is better for the organisation and each post will probably only have one label attached to it. For example, this post and the others like it will all be labelled as “how to” and then this can be added to the home page of your blog so that readers can find all the posts in a series if that is what they are looking for.
Once you’ve used a label once, it is saved by blogger, so to add it to another blog post all you need to do is click on the one you want and it will be added to the blog post. The image below shows the dialogue box and te labels I have used in the past to categorise my blog posts.

Schedule

Scheduling a post is really beneficial to bloggers because it means that it will publish when you want it to without having to sit by a computer or worse try and access blogger from your phone to try and push that tiny publish button.
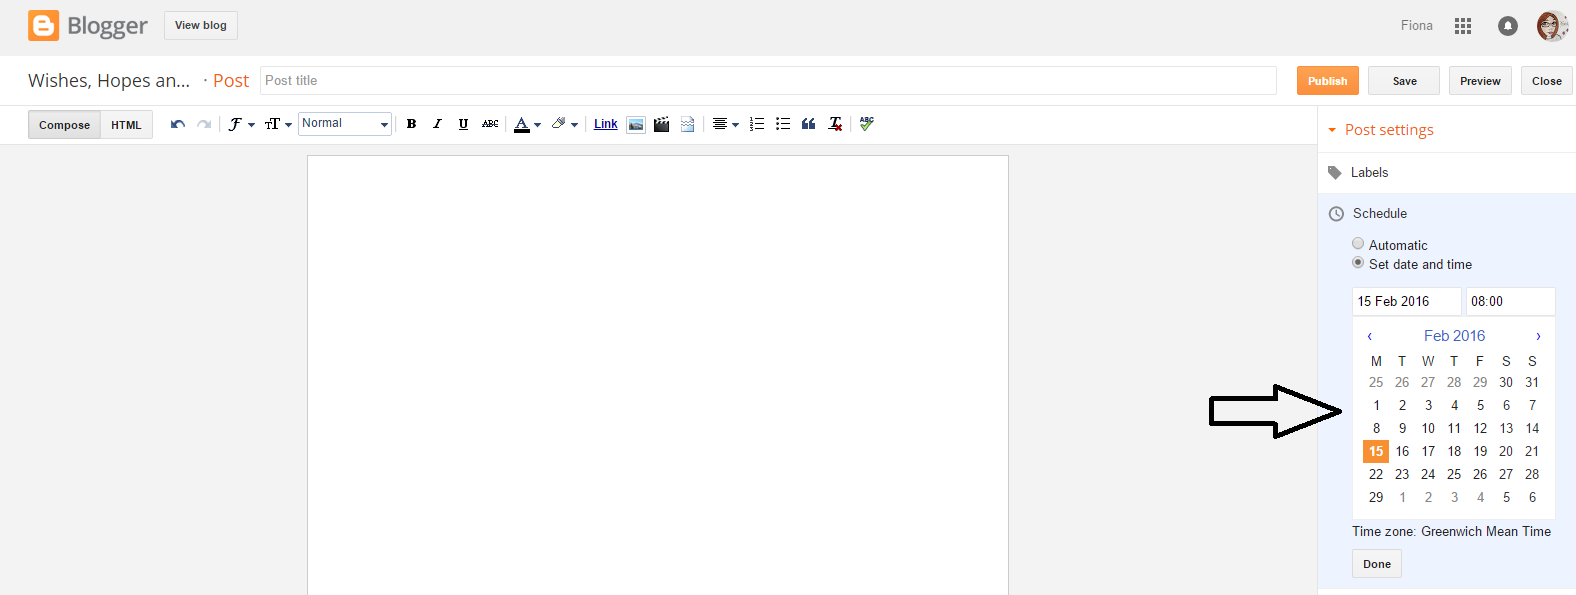
When you open the option, all you need to do is set the date and time of when you would like the post to be published and then click done. The image below shows what the menu looks like. The only thing you need to remember is to click publish instead of close which means the post will show as scheduled in the list and will post when you have set it to.

Permalink

The Permalink/URL is what directs search engines to that particular page within your blog. To make a particular post easier to find you can change the URL which will point to that particular post.
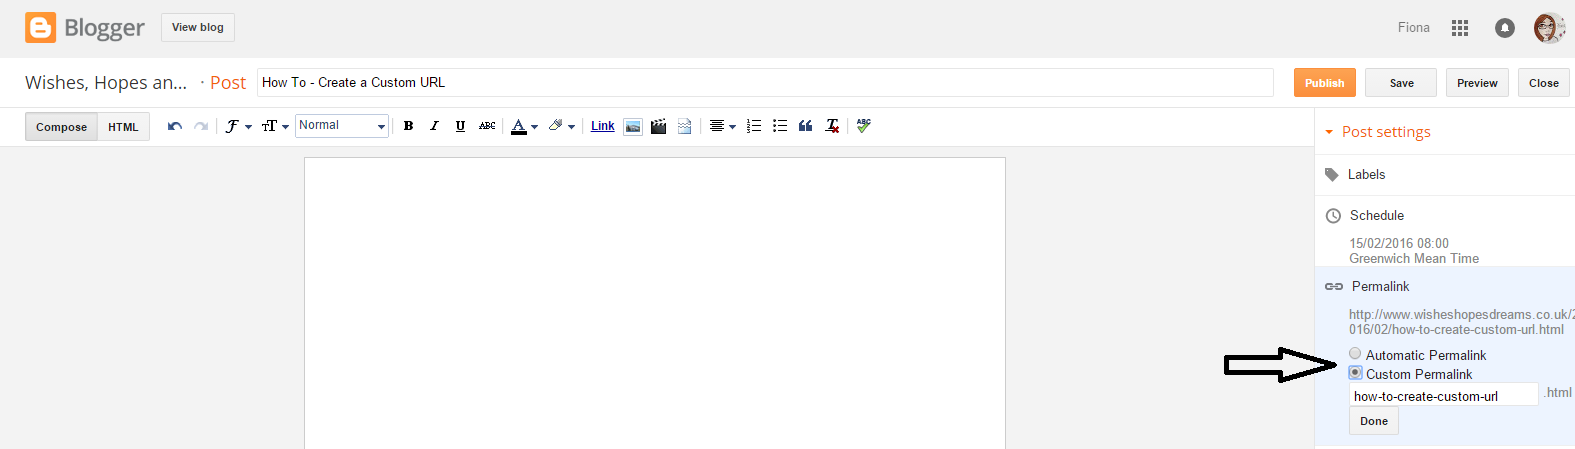
An automatic permalink is created from the post title. In the picture below, the post title is “How To – Create a Custom URL” and by clicking on the option on the right-hand side, I can change the URL to something shorter or longer depending on how I’m feeling by changing the option from Automatic to Custom and then adjusting the text in the box and also adding a hyphen between each word, which is a necessity when creating a URL in HTML (I won’t bore you with the details – just trust me when I say this is how it needs to be).

Search Description

Now this is the really important option of all four post settings. This is where you tell Blogger what the post is about and helps to ensure that when someone types an entry into a search engine that your blog post will show up. Keep it fairly short as the reader that is looking for a blog post will be entering a few keywords rather than a long, lengthy sentence.

Just one thing here – if you want to try and search for your own blog posts do it in an incognito window rather than your standard browser. If you do it from your usual browser, it knows that you blog and will show you your link before anyone else’s. The incognito window doesn’t have your browser history so it will show you an honest representation of where your post will show up in a search. To prove it, there is a picture below of a search I did for my most popular post, which was a review of the Malmaison Hotel in London. As you’ll see it typed, malmaison london review into google and kept going until I saw my post in the returned results, and here I am on page three of the results but if I had done the same search in my usual browser window I would have been top of the results because I’m logged in to Blogger.

So that’s it for the second “how to” post of the series so far. Any posts you would like me to write on this topic or any questions based on what I’ve written up to this point.
I would love any comments or feedback you may have so leave them below or find me on Twitter. 

Posted In: Blogger, Blogging

You’ll Also Love

To Niche or Not to Niche? It’s a Burning Question!
How to Grow Your Pinterest Account: The Easy Method
Business Cards – The key elements & how to design*
Next Post >

How To – Add to a Blog Post

  • Disclaimer
  • Privacy Policy

Copyright © 2026 From Fiona · Theme by 17th Avenue

This website uses cookies to improve your experience. We'll assume you're ok with this, but you can opt-out if you wish.AcceptReject Read More
Privacy & Cookies Policy

Privacy Overview

This website uses cookies to improve your experience while you navigate through the website. Out of these, the cookies that are categorized as necessary are stored on your browser as they are essential for the working of basic functionalities of the website. We also use third-party cookies that help us analyze and understand how you use this website. These cookies will be stored in your browser only with your consent. You also have the option to opt-out of these cookies. But opting out of some of these cookies may affect your browsing experience.
Necessary
Always Enabled
Necessary cookies are absolutely essential for the website to function properly. This category only includes cookies that ensures basic functionalities and security features of the website. These cookies do not store any personal information.
Non-necessary
Any cookies that may not be particularly necessary for the website to function and is used specifically to collect user personal data via analytics, ads, other embedded contents are termed as non-necessary cookies. It is mandatory to procure user consent prior to running these cookies on your website.
SAVE & ACCEPT